miércoles, 4 de octubre de 2017

CTF: Proteus: 1: Vulnhub

Bueno, vamos a revisar el desafío Proteus 1 (Capture The Flag) de Vulnhub

Una vez con la VM del desafío y Kali, comenzamos a escanear la red para identificar el objetivo:

Buscamos los puertos disponibles:


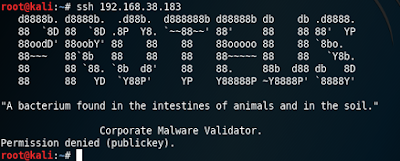
Vemos que el acceso por SSH es solo vía claves públicas


Revisamos a través del navegador e identificamos los campos de entradas y datos importantes.

Probamos subiendo algún archivo binario


Probamos interceptar el request con burp y agregamos una secuencia de comandos


Ahora comenzamos a obtener información del sistema.

Preparamos un shell reverso y el comando en hexadecimal para enviarlo por POST


Una vez enviados los comandos, ejecutamos nc para esperar el shell reverso


Revisando los archivos, encontramos este binario con permisos especiales SUID. El cual se puede ejecutar y escribe en un fichero de log con permisos de root, los argumentos pasados.


Probamos ejecutarlo y vemos que se cae al pasarle un argumento demasiado largo


Vemos también que el binario cayó en el caracter 456; generó un archivo con la cadena desbordada a partir del caracter 456 y el archivo generado queda como root como propietario.


Con estos datos crearemos un exploit para escribir en el archivo /etc/passwd


Explotando la vulnerabilidad


Y el resultado


Y el Elliot como flag


Otra vía alternativa era haber encontrado la contraseña del usuario malwareadm codificada en formato URL en el archivo admin_login_request.js


:wq

jueves, 11 de abril de 2013

Borrar todos los miembros de una lista de distribución zimbra

Para borrar todos lo miembros de una lista de distribución zimbra, preparé el siguiente script:
(lo pondré aquí para que no se me olvide)

zmprov rdlm lista@dominio.com `zmprov gdl lista@dominio.com| grep zimbraMailForwardingAddress: | awk {'print $2'}| tr '\n' ' '`

domingo, 21 de febrero de 2010

Odenando una coleción desde hibernate para un componente flex

Estaba programando un procedimiento remoto en java, usando hibernate. Que recupera una tabla anidada desde la base de datos para poblar un menú (mx.control.MenuBar). Por lo que el orden de los items es importante.

Agregando la opción order-by="atributoParaOrdenar" al archivo de mapping de la tabla, funciona bien solo del lado del servidor, pero los items en el componente aparece completamente desordenado (Los items de un mismo mivel). Lo que puede parecer natural, ya que el mapeo por defecto es de un java.util.Set de Java a un mx.collections.ArrayCollection de AS3.

Para corregir el asunto agregué el atributo sort="natural" al archivo de mapping. ej
<set name="children" inverse="true" lazy="false" table="menuitem" fetch="select" order-by="orden" sort="natural">
Luego la entidad java debe implementar la interfaz java.lang.Comparable y declarar la colección como un java.util.SortedSet. ej

private SortedSet children = new TreeSet();

con sus respectivos getters y setters.

Y re-escribir el algoritmo de ordenamiento para esta entidad. ej:
@Override
public int compareTo(Menuitem o) {
return this.orden.compareTo(o.getOrden());
}


Con esto ya aparecerá ordenado el el componente


referencia

lunes, 15 de diciembre de 2008

Programa para determinar la compañía de un movil (Chile)

Aprovechando el insomnio de la noche del sábado, me he puse a programar una pequeña aplicación java para el celular, en éste al ingresar un número telefónico me indica a qué compañía pertenece (en Chile), y con esto también me dejo de andar preguntado "oye de qué compañía es tu móvil ?":) .
Por ahí anda otra aplicación que hace lo mismo, pero no me permitía seleccionar el número de mi agenda :(
Bueno sin más aquí dejo programa, solo tienen que copiar el archivo ComChile.jar al móvil y ejecutarlo ahí.
Además adjunto el código fuente.
Cualquier crítica, sugerencia o comentario será bienvenido.

Descargar programa

Fuente

Acá la clase principal:
/*  ComChile v1.1
* ------------------
* Copyright (C) 2008, René Vielma M. renevielma@gmail.com.
*
* This program is free software; you can redistribute it and/or modify
* it under the terms of the GNU General Public License as published by
* the Free Software Foundation; either version 2 of the License, or
* (at your option) any later version.
*
* This program is distributed in the hope that it will be useful,
* but WITHOUT ANY WARRANTY; without even the implied warranty of
* MERCHANTABILITY or FITNESS FOR A PARTICULAR PURPOSE. See the
* GNU Library General Public License for more details.
*
* You should have received a copy of the GNU General Public License
* along with this program; if not, write to the Free Software
* Foundation, Inc., 59 Temple Place - Suite 330, Boston, MA 02111-1307, USA.
*/

package pkg;


import java.io.IOException;
import java.io.InputStream;

import javax.microedition.lcdui.Alert;
import javax.microedition.lcdui.AlertType;
import javax.microedition.lcdui.Command;
import javax.microedition.lcdui.CommandListener;
import javax.microedition.lcdui.Display;
import javax.microedition.lcdui.Displayable;
import javax.microedition.lcdui.Form;
import javax.microedition.lcdui.Image;
import javax.microedition.lcdui.ImageItem;
import javax.microedition.lcdui.Item;
import javax.microedition.lcdui.ItemStateListener;
import javax.microedition.lcdui.TextField;
import javax.microedition.midlet.MIDlet;
import javax.microedition.midlet.MIDletStateChangeException;


/**
* ComChile
* @author rene
*/
public class ComChile extends MIDlet implements ItemStateListener,CommandListener {

private Command salir, limpiar, about;
private Display display;
private Form formulario;
private TextField txt;
private Image imgClaro, imgMovistar, imgEntel;
private ImageItem imagenItem;

public ComChile() {

display = Display.getDisplay(this);

formulario = new Form("ComChile");

//Carga de imagen
try {
imgClaro = Image.createImage("/claro.jpg");
imgMovistar = Image.createImage("/movistar.jpg");
imgEntel = Image.createImage("/entel.jpg");
} catch (IOException e) {
e.printStackTrace();
}

salir = new Command("Salir", Command.EXIT, 1);
about = new Command("about", Command.HELP, 3);
limpiar = new Command("Limpiar", Command.OK, 0);
txt = new TextField("Número telefónico",null,20,TextField.PHONENUMBER);
imagenItem = new ImageItem(null,null ,Item.LAYOUT_CENTER,"no está la imagen",Item.BUTTON);

formulario.append(txt);

formulario.addCommand(salir);
formulario.addCommand(limpiar);
formulario.addCommand(about);
formulario.setCommandListener(this);
formulario.setItemStateListener(this);

}

protected void destroyApp(boolean arg0) throws MIDletStateChangeException {}

protected void pauseApp() {}

protected void startApp() throws MIDletStateChangeException {
display.setCurrent(formulario);
}

public void commandAction(Command c, Displayable s) {

if (c.getCommandType() == Command.EXIT)
notifyDestroyed();

if(c == limpiar){
txt.setString("");
if(formulario.size() == 2)
formulario.delete(1);
}

if(c == about){
Alert alert = new Alert("About", "ComChile v1.1 autor: Rene Vielma M.", null,AlertType.INFO);
Display.getDisplay(this).setCurrent(alert);
}
}

public void itemStateChanged(Item i){
if(i == txt){
if(formulario.size() == 2)
formulario.delete(1);

if(txt.getString().length() == 8 || (txt.getString().length() == 12) && txt.getString().substring(0, 4).equals("+569")){
System.out.println(txt.getString());
String num = (txt.getString().length() == 12 )?txt.getString().substring(4):txt.getString();

char c = buscarCom(num.substring(0, 4));

if(c == 'T'){
imagenItem.setImage(imgMovistar);
formulario.append(imagenItem);
}
if(c == 'E'){
imagenItem.setImage(imgEntel);
formulario.append(imagenItem);
}
if(c == 'C'){
imagenItem.setImage(imgClaro);
formulario.append(imagenItem);
}
}
}
}

public char buscarCom(String num){
try {
InputStream in = getClass().getResourceAsStream("/datos.txt");

StringBuffer sb = new StringBuffer();

int ch;
while ((ch = in.read()) != -1){
if((char)ch == '\n'){
if(num.equals(sb.toString().substring(0, 4))){
in.close();
return sb.charAt(4);
}
sb = new StringBuffer();
}else{
sb.append((char)ch);
}
}

in.close();

} catch (Exception e) {
Alert alert = new Alert("Error!", "No se pudo acceder al archivo de datos", null,AlertType.ERROR);
alert.setTimeout(Alert.FOREVER);
Display.getDisplay(this).setCurrent(alert);
}
return 'x';
}
}

miércoles, 7 de mayo de 2008

Mostrar el contenido de un directorio servido por Tomcat

Para mostrar u ocultar el contenido de un directorio servido por Tomcat, se debe modificar la definición del servlet "default" en el archivo $(instalaciónDeTomcat)/conf/web.xml.

Cambiando

        <init-param>
<param-name>listings</param-name>
<param-value>false</param-value>
</init-param>


por: (para que muestre el directorio)

        <init-param>
<param-name>listings</param-name>
<param-value>true</param-value>
</init-param>

martes, 6 de mayo de 2008

Tutorial de Hibernate

Este tutorial se basa en el mapeo de una base de datos en Postgresql, utilizando eclipse y el Hibernate Tools.

Primero crearemos el usuario y la base de datos a utilizar
$ createuser -P -U postgres mundo
Enter password for new role:
Enter it again:
Shall the new role be a superuser? (y/n) n
Shall the new role be allowed to create databases? (y/n) y
Shall the new role be allowed to create more new roles? (y/n) n
CREATE ROLE
$ createdb -U mundo -W mundo
Password:
CREATE DATABASE
$


Ahora con el siguiente script, creamos la estructura de la base de datos

mundo.sql
SET client_encoding = 'UTF8';
SET check_function_bodies = false;
SET client_min_messages = warning;

-- Table: continente

CREATE TABLE continente
(
codcontinente serial NOT NULL,
nombre character varying(50) NOT NULL,
CONSTRAINT pk_continente PRIMARY KEY (codcontinente)
)
WITH (OIDS=FALSE);
ALTER TABLE continente OWNER TO mundo;

-- Table: pais

CREATE TABLE pais
(
codpais serial NOT NULL,
valor character varying(50) NOT NULL,
codcontinente integer NOT NULL,
CONSTRAINT pk_pais PRIMARY KEY (codpais),
CONSTRAINT fk_continente FOREIGN KEY (codcontinente)
REFERENCES continente (codcontinente) MATCH SIMPLE
ON UPDATE NO ACTION ON DELETE NO ACTION
)
WITH (OIDS=FALSE);
ALTER TABLE pais OWNER TO mundo;

-- Index: fki_pais_continente

CREATE INDEX fki_pais_continente
ON pais
USING btree
(codcontinente);


$ psql -U mundo -W -f mundo.sql
Password for user mundo:
SET
SET
SET
CREATE TABLE
ALTER TABLE
CREATE TABLE
ALTER TABLE
CREATE INDEX
$


Ahora crearemos la aplicación que utilizará estas dos tablas.

Primero creamos un "Java Proyect"


Le agregamos las librerías necesarias para Hibernate y el driver jdbc para Postgresql

Una vez creado el proyecto, agregamos el archivo de configuración de Hibernate


Lo dejamos en la raíz del directorio de recursos.


Definimos los parámetros de conexión con la base de datos.

Creamos el "Hibernate Console Configuration", este es el perfil que define todas las características del proyecto con Hibernate.


Una vez creado el "Console Configuration", podemos ir a la vista de Hibernate y ejecutar el generador de código.


Creamos un nuevo perfil.


Le indicamos las caracteristicas de nuestro proyecto.


Le idicamos que genere los archivos de configuración de Hibernate y las clases POJO. Y ejecutamos.


Aquí podemos ver el código generado.


Luego agregamos hibernate.revenge.xml, el archivo de filtro para la ingeniería inversa.

Le indicamos que se guarde en el directorio de recursos del proyecto.

Podemos agregar algún retoque, por ejemplo, que los campos INTEGER de la base de datos, sean mapeados como java.lang.Integer.


Retocamos las claves primarias, para que utilicen la secuencia definida en la base de datos.


Lo mismo con la otra tabla.


Ahora agregagemos un par de clases de servicio, que nos ayudaran con las operaciónes CRUD.

SessionFactory.java : como su nombre lo indica es una fábrica de sesiones.

package test;

import org.hibernate.HibernateException;
import org.hibernate.Session;
import org.hibernate.cfg.Configuration;

/**
* Configures and provides access to Hibernate sessions, tied to the
* current thread of execution. Follows the Thread Local Session
* pattern, see {@link http://hibernate.org/42.html }.
*/
public class SessionFactory {

/**
* Location of hibernate.cfg.xml file.
* Location should be on the classpath as Hibernate uses
* #resourceAsStream style lookup for its configuration file.
* The default classpath location of the hibernate config file is
* in the default package. Use #setConfigFile() to update
* the location of the configuration file for the current session.
*/
private static String CONFIG_FILE_LOCATION = "/hibernate.cfg.xml";
private static final ThreadLocal threadLocal = new ThreadLocal();
private static Configuration configuration = new Configuration();
private static org.hibernate.SessionFactory sessionFactory;
private static String configFile = CONFIG_FILE_LOCATION;

private SessionFactory() {
}

/**
* Returns the ThreadLocal Session instance. Lazy initialize
* the SessionFactory if needed.
*
* @return Session
* @throws HibernateException
*/
public static Session getSession() throws HibernateException {
Session session = (Session) threadLocal.get();

if (session == null || !session.isOpen()) {
System.out.println("<<<<<<<<<>>>>>>>");
if (sessionFactory == null) {
rebuildSessionFactory();
}
session = (sessionFactory != null) ? sessionFactory.openSession()
: null;
threadLocal.set(session);
}

return session;
}

/**
* Rebuild hibernate session factory
*
*/
public static void rebuildSessionFactory() {
try {
configuration.configure(configFile);
sessionFactory = configuration.buildSessionFactory();
} catch (Exception e) {
System.err
.println("%%%% Error Creating SessionFactory %%%%");
e.printStackTrace();
}
}

/**
* Close the single hibernate session instance.
*
* @throws HibernateException
*/
public static void closeSession() throws HibernateException {
Session session = (Session) threadLocal.get();
threadLocal.set(null);

if (session != null) {
session.close();
}
}

/**
* return session factory
*
*/
public static org.hibernate.SessionFactory getSessionFactory() {
return sessionFactory;
}

/**
* return session factory
*
* session factory will be rebuilded in the next call
*/
public static void setConfigFile(String configFile) {
SessionFactory.configFile = configFile;
sessionFactory = null;
}

/**
* return hibernate configuration
*
*/
public static Configuration getConfiguration() {
return configuration;
}

}


ControlHibernate.java
package test;

import java.util.ArrayList;
import java.util.List;

import org.apache.log4j.Logger;
import org.hibernate.HibernateException;
import org.hibernate.Session;
import org.hibernate.Transaction;

public class ControlHibernate {

private static Logger log = Logger.getLogger(ControlHibernate.class);

public static List getObjetos(String hql) throws HibernateException {
List items = new ArrayList();
Session session = null;
Transaction tx = null;
session = SessionFactory.getSession();
try {
tx = session.beginTransaction();
items = session.createQuery(hql).list();
tx.commit();
} catch (HibernateException e) {
if (tx != null)
tx.rollback();
throw e;
} finally {
session.close();
}
return items;
}

public static void guardarObjeto(Object objeto, Integer codigo)
throws HibernateException {
Session session = null;
Transaction tx = null;
session = SessionFactory.getSession();
try {
tx = session.beginTransaction();
// modifica objeto
if ((codigo != null) && (codigo.intValue() != 0)) {
log.info("va a hacer 'merge' de objeto");
session.saveOrUpdate(objeto);
session.flush();
} else { // inserta objeto
log.info("va a hacer 'save' de objeto");
session.save(objeto);
}
tx.commit();
} catch (HibernateException e) {
if (tx != null)
tx.rollback();
throw e;
} finally {
session.close();
}
}
}

Como prueba final de este tutorial, Creamos una clase Prueba.java , que crea un objeto Pais, con un objeto Continente anidado y los almacena en la base de datos.


Aquí podemos observer que los datos se ingresaron correctamente.

También podemos utilizar el editor de sentencias HQL, para realizar pruebas.


Si tienes una crítica o aporte, no dudes en comentarla.

:wq

viernes, 2 de mayo de 2008

Creando un proyecto Flex con Java y BlazeDS con RemoteObject en entornos separados

En este tutorial explico paso a paso la creación de un proyecto Flex con Java en entornos separados (front-end - back-end), con BlazeDS y RemoteObject (en Linux).

Se asume tener instalado Jdk y con sus variables de entorno, sino puedes revisar aquí

Configuración del Back-end

Primero debemos bajar BlazeDS, en mi caso bajé el Turnkey, pues ya viene deployado el BlazeDS.
Lo dejé en /home/rene/blazeds_turnkey_3-0-0-544.

Ahora en eclipse creamos un Java Project


Le ponemos un nombre y le indicamos la ruta del Turnkey, como se vé en la imagen. Y siguiente


Establemos la carpeta src como "source folder", ya que por default no lo es. Le idicamos que las clases compiladas deben quedar en el directorio "classes". Y finalizamos

Creamos una clase de prueba.


Le ponemos nombre a la clase y la dejamos bajo un paquete.


Creamos un simple método que retorne un String.


Lo declaramos como "destination" en el archivo "flex/remoting-config.xml"


Agregamos una sección de "login-config" en el web.xml

<login-config>
<auth-method>BASIC</auth-method>
</login-config>


Guardamos todo y levantamos el servidor:

$ cd blazeds_turnkey_3-0-0-544/sampledb/
rene ~/blazeds_turnkey_3-0-0-544/sampledb $ ./startdb.sh
[Server@18a7efd]: [Thread[main,5,main]]: checkRunning(false) entered
[Server@18a7efd]: [Thread[main,5,main]]: checkRunning(false) exited
[Server@18a7efd]: Startup sequence initiated from main() method
[Server@18a7efd]: Loaded properties from [/home/rene/blazeds_turnkey_3-0-0-544/sampledb/server.properties]
[Server@18a7efd]: Initiating startup sequence...
[Server@18a7efd]: Server socket opened successfully in 29 ms.
[Server@18a7efd]: Database [index=0, id=0, db=file:flexdemodb/flexdemodb, alias=flexdemodb] opened sucessfully in 1203 ms.
[Server@18a7efd]: Startup sequence completed in 1233 ms.
[Server@18a7efd]: 2008-04-30 23:14:53.387 HSQLDB server 1.8.0 is online
[Server@18a7efd]: To close normally, connect and execute SHUTDOWN SQL
[Server@18a7efd]: From command line, use [Ctrl]+[C] to abort abruptly

$ cd blazeds_turnkey_3-0-0-544/tomcat/bin/
rene ~/blazeds_turnkey_3-0-0-544/tomcat/bin $ ./startup.sh
Using CATALINA_BASE: /home/rene/blazeds_turnkey_3-0-0-544/tomcat
Using CATALINA_HOME: /home/rene/blazeds_turnkey_3-0-0-544/tomcat
Using CATALINA_TMPDIR: /home/rene/blazeds_turnkey_3-0-0-544/tomcat/temp
Using JRE_HOME: /usr/local/jdk1.6.0_06
$
Comprobamos abriendo el navegador en http://localhost:8400

Configuración del Front-end

Ahora creamos un Flex Project (en el Flex Builder plugin para Linux)


En la configuración del server le indicamos donde están los servicio que vamos a consumir y donde queremos colocar lo archivos generado y compilados.

Creamos una simple aplicación que consuma el RemoteObject definido en el destination. Y ejecutamos la aplicación.


Al pinchar el botón, su label se cargará con lo que retorna el método de la clase java.

:wq